Archive for May, 2018

Google joins AWS and Azure as leader in Gartner’s 2018 IaaS Magic Quadrant


After intensive investing in Cloud Computing, particularly geared towards enterprises, Google has finally joined Amazon (Amazon Web Services) and Microsoft (Azure) as a leader in Infrastrucutre as a service (Iaas) in Gartner’s Magic Quadran for 2018. GCP – Google Cloud Platform – is very intuitive to use and particular popular among data scientists.


https://www.cloudcomputing-news.net/news/2018/may/29/gartners-2018-iaas-magic-quadrant-google-joins-leaders-zone-only-six-vendors-make-cut/

“Google has clambered into the leaders’ section of Gartner’s latest infrastructure as a service (IaaS) Magic Quadrant, while the wheat has been separated from the chaff.

The annual report concluded that the cloud IaaS market is now a three-horse race in the top right box, with the leaders’ zone not being an Amazon Web Services (AWS) and Microsoft-only area for the first time since 2013.  …

https://cloudplatform.googleblog.com/2018/05/Google-named-a-Leader-in-2018-Gartner-Infrastructure-as-a-Service-Magic-Quadrant.html

“We’re pleased to announce that Gartner recently named Google as a Leader in the 2018 Gartner Infrastructure as a Service Magic Quadrant.
With an increasing number of enterprises turning to the cloud to build and scale their businesses, research from organizations like Gartner can help you evaluate and compare cloud providers.

…”


Visit https://linuxfreelancer.com/getting-started-google-cloud-platform/ for links to get started with GCP.

IP subnet calculator

Linux – IP subnet calculation with ipcalc


ipcalc is a program to perform simple manipulation of IP addresses and is useful for calculating various network masks given an IP address. Some of the uses of ipcalc are –

  • Validate IP address
  • Display calculated broadcast address
  • Show hostname determined via DNS
  • Display default mask for IP
  • Display network address or prefix

Before using ipcalc, make sure you have the binary installed in your Operating system, if not install it by following below instructions –

1. Installation instructions for various Operating Systems

a. Fedora/Red Hat/CentOS

yum install initscripts

b. Debian/Ubuntu

apt-get install ipcalc

c. MacOS

brew install ipcalc

Install ipcalc on Mac OSX

d. Windows

http://jodies.de/ipcalc-faq/win32.html


2. How to use ipcalc

Note below examples were tested in CentOS 6.8, it might not work for other distros or Operating systems. Check the ipcalc documentation for your OS.

a. Check if IP address is valid for IPv4 or IPv6 ( it defaults to IPv4)

[daniel@kauai ~]$ ipcalc -c 1.2.3.4
[daniel@kauai ~]$ ipcalc -c 1.2.3.4/32
[daniel@kauai ~]$ ipcalc -c 1.2.3.444
ipcalc: bad IPv4 address: 1.2.3.444

It will exit with a non-zero status code if the IP address is not valid, with zero if valid. For scripting, use ‘-s’ option for silent, that way it doesn’t display error messages.


[daniel@kauai ~]$ ipcalc -s -c 1.2.3.4
[daniel@kauai ~]$ echo $?
0

[daniel@kauai ~]$ ipcalc -s -c 1.2.3.444
[daniel@kauai ~]$ echo $?
1

b. Show boradcast address 


[daniel@kauai ~]$ ipcalc -b 10.10.0.1/24
BROADCAST=10.10.0.255
[daniel@kauai ~]$ ipcalc -b 10.10.0.1/22
BROADCAST=10.10.3.255
[daniel@kauai ~]$ ipcalc -b 10.10.0.1/8
BROADCAST=10.255.255.255

c. Reverse dns

[daniel@kauai ~]$ ipcalc -h 8.8.8.8
HOSTNAME=google-public-dns-a.google.com

$ ipcalc -h 162.247.79.246
HOSTNAME=securenet-server.net

d.  Display default netmask for IP (class A, B, or C)


[daniel@kauai ~]$ ipcalc -m 10.10.10.1
NETMASK=255.0.0.0
[daniel@kauai ~]$ ipcalc -m 192.168.10.1
NETMASK=255.255.255.0
[daniel@kauai ~]$ ipcalc -m 172.16.0.1
NETMASK=255.255.0.0


e. Show network address


[daniel@kauai ~]$ ipcalc -n 10.10.244.8/19
NETWORK=10.10.224.0
[daniel@kauai ~]$ ipcalc -n 10.10.244.8/20
NETWORK=10.10.240.0
[daniel@kauai ~]$ ipcalc -n 10.10.244.8/30
NETWORK=10.10.244.8


Split a subnet – this feature might not be supported in all ipcalc versions, check for your OS.

This is the best feature of ipcalc in my opinions, you dont’ have to do the subnet and bits calculation by hand. This feature was available in my Ubuntu 16 VM but not RedHat.


$ lsb_release -a
No LSB modules are available.
Distributor ID: Ubuntu
Description: Ubuntu 16.04.3 LTS
Release: 16.04
Codename: xenial

$ ipcalc -v
0.41

For instance to split a /20 subnet into two subnets of size 1024 each –


ipcalc 10.10.0.0/20 --s 1024 1024
Address: 10.10.0.0 00001010.00001010.0000 0000.00000000
Netmask: 255.255.240.0 = 20 11111111.11111111.1111 0000.00000000
Wildcard: 0.0.15.255 00000000.00000000.0000 1111.11111111
Network: 10.10.0.0/20 00001010.00001010.0000 0000.00000000
HostMin: 10.10.0.1 00001010.00001010.0000 0000.00000001
HostMax: 10.10.15.254 00001010.00001010.0000 1111.11111110
Broadcast: 10.10.15.255 00001010.00001010.0000 1111.11111111
Hosts/Net: 4094 Class A, Private Internet

1. Requested size: 1024 hosts
Netmask: 255.255.248.0 = 21 11111111.11111111.11111 000.00000000
Network: 10.10.0.0/21 00001010.00001010.00000 000.00000000
HostMin: 10.10.0.1 00001010.00001010.00000 000.00000001
HostMax: 10.10.7.254 00001010.00001010.00000 111.11111110
Broadcast: 10.10.7.255 00001010.00001010.00000 111.11111111
Hosts/Net: 2046 Class A, Private Internet

2. Requested size: 1024 hosts
Netmask: 255.255.248.0 = 21 11111111.11111111.11111 000.00000000
Network: 10.10.8.0/21 00001010.00001010.00001 000.00000000
HostMin: 10.10.8.1 00001010.00001010.00001 000.00000001
HostMax: 10.10.15.254 00001010.00001010.00001 111.11111110
Broadcast: 10.10.15.255 00001010.00001010.00001 111.11111111
Hosts/Net: 2046 Class A, Private Internet

Needed size: 4096 addresses.
Used network: 10.10.0.0/20
Unused:


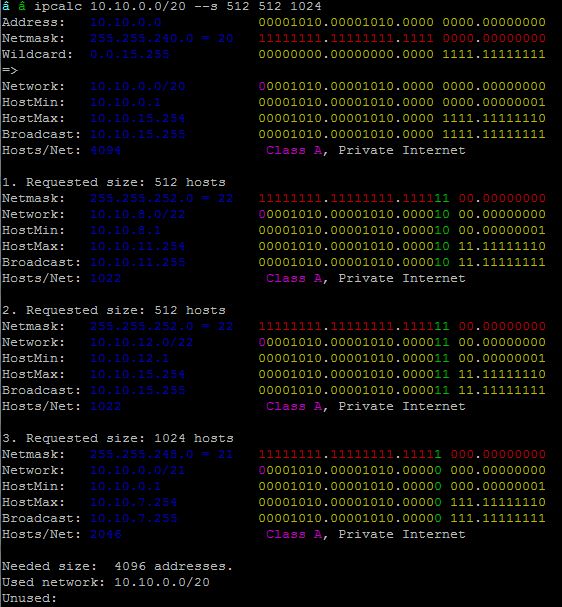
Let us split it into 3 subnets of sizes 512, 512 and 1024

ipcalc


Useful links – 


https://linux.die.net/man/1/ipcalc

http://jodies.de/ipcalc


C programming Language – Code snippets

C Programming Language, 2nd Edition

Compiling and running the sample codes using gcc :


gcc sample.c -o sample
./sample

Chapter 4 – Functions and Program structure


1. A conditional in the C preprocessor


#include<stdio.h>

#define SYSTEM 5

#if SYSTEM == 1
#define HDR 10
#elif SYSTEM == 2
#define HDR 20
#elif SYSTEM == 3
#define HDR 30
/*#else
#define HDR 0*/
#endif

#if !defined(HDR)
#define HDR 50
#endif

int main()

{
printf("HDR = %d \n", HDR);
return 0;
}


2. Macro definitions


#include<stdio.h>

#define max(A,B) ((A)>(B) ? (A) : (B))
#define forever for(;;)
#define square(x) ((x)*(x))
#define dprint(expr) printf(#expr " = %g\n", expr)
#define paste(front, back) front ## back

int main()

{
char name[]="daniel";
int counter=0,x=4,y=2;
printf("Max=%d\n",max(8,9));

forever
{
printf(" %d ", counter);
if ( counter++ >= 10) break;
}

printf("\n");

printf("Square of 4 is %d\n",square(4));

dprint(x/y);

return 0;
}


3. Pattern matching


#include<stdio.h>

#define MAXLINE 1000

int getline(char line[], int max);
int strindex(char source[], char searchfor[]);

char pattern[]="dan";

int main()
{
char line[MAXLINE];
int found=0;
while(getline(line,MAXLINE)>0)
if(strindex(line,pattern) >= 0)
{
printf("%s",line);
found ++;
}
return found;
}

int getline(char s[], int lim)
{
int c, i;
i=0;
while(--lim > 0 && (c=getchar()) != EOF && c!='\n')
s[i++]=c;
if(c=='\n')
s[i++]=c;
s[i]='\0';
return i;
}

int strindex(char s[], char t[])
{
int i,j,k;
for(i=0; s[i]!='\0'; i++)
{
for(j=i, k=0; t[k]!='\0' && s[j]==t[k]; j++, k++);
if(k>0 && t[k] == '\0')
return i;
}
return -1;
}


4. Reverse polish calculator


/*reverse Polish calculator */
#include<stdio.h>
#include<stdlib.h>
#include<ctype.h>

#define MAXOP 100
#define NUMBER '0'
#define MAXVAL 100
#define BUFSIZE 100

int getch(void);
void ungetch(int);
int getop(char []);
void push(double);
double pop(void);

int sp = 0;
double val[MAXVAL];
char buf[BUFSIZE];
int bufp=0;

int main()
{
int type;
double op2;
char s[MAXOP];

while((type=getop(s)) != EOF)
{
switch(type)
{
case NUMBER: push(atof(s)); break;
case '+': push(pop() + pop()); break;
case '-': op2=pop(); push(pop() - op2); break;
case '*': push(pop() * pop()); break;
case '/':
op2=pop();
if(op2 != 0.0) push(pop()/op2);
else
printf("Error: zero divisor\n");
break;
case '\n': printf("\t%.8g\n", pop()); break;
default: printf("Error: unknown command %s\n", s); break;
}
}

return 0;
}

void push(double f)
{
if(sp < MAXVAL) val[sp++] = f;
else
printf("Error: stack full, can't push %g\n", f);
}

double pop(void)
{
if(sp > 0)
return val[--sp];
else
{
printf("Error: stack empty\n");
return 0.0;
}
}

int getop(char s[])
{
int i, c;

while((s[0] = c = getch()) == ' ' || c == '\t') ;

s[1] = '\0';
if(!isdigit(c) && c!= '.') return c;
i=0;
if(isdigit(c))
while(isdigit(s[++i] = c= getch())) ;
if ( c=='.')
while(isdigit(s[++i] = c = getch())) ;
s[i] = '\0';
if ( c!= EOF) ungetch(c);
return NUMBER;
}

int getch(void)
{
return (bufp > 0) ? buf[--bufp] : getchar();
}

void ungetch(int c)
{
if (bufp >= BUFSIZE) printf("ungetch: too many characters\n");
else
buf[bufp++]=c;
}


5. Quick sort


#include<stdio.h>

void qsort(int v[], int left, int right);

int main()

{

int i, v[]={9,5,8,12,56,7,1,19,27,99,27,13,3};

for(i=0; i<13; i++) printf(" %d ",v[i]);
printf("\n");

qsort(v,0,12);

for(i=0; i<13; i++) printf(" %d ",v[i]);
printf("\n");

return 0;
}

void qsort(int v[], int left, int right)
{
int i, last;
void swap(int v[], int i, int j);

if(left >= right) return;
swap(v, left, (left + right)/2);

last = left;

for(i=left+1; i<=right; i++)
if(v[i] < v[left]) swap(v,++last, i);

swap(v, left, last);
qsort(v, left, last-1);
qsort(v, last+1, right);

}

void swap(int v[], int i, int j)
{
int temp;

temp = v[i];
v[i] = v[j];
v[j] = temp;
}


6. Rudimentary calculator


#include<stdio.h>
#include<ctype.h>

#define MAXLINE 100

double atof(char s[]);
int getline(char line[], int max);

int main()
{

double sum, atof(char []);
char line[MAXLINE];
int getline(char line[], int max);

sum=0;
while(getline(line,MAXLINE) > 0)
printf("\t%g\n", sum+=atof(line));

return 0;
}

double atof(char s[])
{

double val, power;
int i, sign;
for (i=0; isspace(s[i]); i++);

sign=(s[i]=='-') ? -1: 1;
if(s[i]=='+' || s[i] == '-') i++;
for (val=0.0; isdigit(s[i]); i++)
val = 10.0 * val + (s[i] - '0');

if(s[i] == '.') i++;

for(power=1.0; isdigit(s[i]); i++)
{
val = 10.0*val + (s[i] - '0');
power*=10;
}

return (sign*val/power);

}

int getline(char line[], int max)
{
int c,i;
for(i=0; i<max-1 && (c=getchar())!=EOF && c!='\n'; ++i)
line[i]=c;
if(c=='\n') {
line[i]=c;
++i;
}
line[i]='\0';
return i;

}


7. ASCII string to float conversion


#include<stdio.h>
#include<ctype.h>

int main()
{
double val, power;
int i, sign;
char s[]=" -23.590 ";

for (i=0; isspace(s[i]); i++);

sign=(s[i]=='-') ? -1: 1;
if(s[i]=='+' || s[i] == '-') i++;
for (val=0.0; isdigit(s[i]); i++)
val = 10.0 * val + (s[i] - '0');

if(s[i] == '.') i++;

for(power=1.0; isdigit(s[i]); i++)
{
val = 10.0*val + (s[i] - '0');
power*=10;
}

printf("Value = %f\n", (sign*val/power));
return 1;
}


References –
Python modify user-agent

How to generate user-agent header for web requests in Python


In previous post, we saw how to modify user-agent header in wget, curl and httpie programs. In this post, I will show you how to modify user-agent header in Python’s popular requests module. There are several reasons for modify user agent, one of which is to trigger a different response from a website. Many website offer different content based on user-agent header. You can find user-agent header details here.

In Python, one of the most popular libraries to query web servers is the requests module. The requests module allows you to pass header information using the headers option –

1. Simplest use case, without a header

import requests
requests.get('http://linuxfreelancer.com/status')

And this is how it is logged on the web server side, Apache in this case –

76.1.2.3 [20/May/2018:01:08:37 -0400] "GET /status HTTP/1.1" 200 359 "-" "python-requests/2.18.4" 1798

The user-agent is simply showing as “python-requests/2.18.4”, and some website might even block this to prevent web crawlers. So the next step is to modify this.


2. Modify user-agent header

headers = {'User-Agent': 'Mozilla/5.0 (Android 5.1; Tablet; rv:50.0) Gecko/50.0 Firefox/50.0'}
requests.get('http://linuxfreelancer.com/status', headers=headers)

And this is what the access log entry looks like on the web server side –

76.1.2.3  [20/May/2018:01:11:29 -0400] "GET /status HTTP/1.1" 200 359 "-" "Mozilla/5.0 (Android 5.1; Tablet; rv:50.0) Gecko/50.0 Firefox/50.0" 1289

As you can see above, the user-agent entry has several identifiers which is not easy to remember. The best way would be to programatically generate valid user-agents for different platforms.


3. Generate valid user-agents

The user_agent module is used for generating random and yet valid web user agents. You can install it with ‘pip install user_agent’.

This module generate user-agent strings for differnt devices types such as desktop, smartphone and table, as well as OS types (Windows, Linux, Mac, Android …). Let us try it in a virtual environment –

virtualenv /tmp/venv
source /tmp/venv/bin/activate
pip install user_agent

Now run Python in an interactive mode –

import requests
from user_agent import generate_user_agent 

In [8]: generate_user_agent()
Out[8]: 'Mozilla/5.0 (Windows NT 6.2) AppleWebKit/537.36 (KHTML, like Gecko) Chrome/53.0.2803.5 Safari/537.36'

In [9]: generate_user_agent()
Out[9]: 'Mozilla/5.0 (Windows NT 10.0; Win64; x64; rv:49.0) Gecko/20100101 Firefox/49.0'

In [11]: generate_user_agent(os='linux')
Out[11]: 'Mozilla/5.0 (X11; Ubuntu; Linux i686 on x86_64) AppleWebKit/537.36 (KHTML, like Gecko) Chrome/56.0.2942.3 Safari/537.36'

In [13]: generate_user_agent(device_type='tablet')
Out[13]: 'Mozilla/5.0 (Linux; Android 4.4; HTC Desire 616 dual sim Build/JDQ39) AppleWebKit/537.36 (KHTML, like Gecko) Chrome/56.0.2938.21 Safari/537.36'

In [14]: generate_user_agent(device_type='desktop', os='win')
Out[14]: 'Mozilla/5.0 (Windows NT 6.1; rv:45.0) Gecko/20100101 Firefox/45.0'

In [20]: generate_user_agent(navigator='chrome', os='linux', device_type='desktop')
Out[20]: 'Mozilla/5.0 (X11; Ubuntu; Linux i686) AppleWebKit/537.36 (KHTML, like Gecko) Chrome/55.0.2894.26 Safari/537.36'

This allows us to generate from random to specific valid user-agent header information. We can then pass this randomly generated user-agent text to the requests module header option, and we will view our web server logs to validate –

from user_agent import generate_user_agent
import requests
requests.get('http://linuxfreelancer.com/status', headers={'User-Agent': generate_user_agent(navigator='firefox', os='linux')})

Log entry –

76.1.2.3 – – [20/May/2018:01:28:24 -0400] “GET /status HTTP/1.1” 200 359 “-” “Mozilla/5.0 (X11; Ubuntu; Linux x86_64; rv:45.0) Gecko/20100101 Firefox/45.0” 1486


References –


http://docs.python-requests.org/en/master/

https://developer.mozilla.org/en-US/docs/Web/HTTP/Headers/User-Agent

Configure IP Aliases in Red Hat / CentOS


IP aliasing is a term for assigning multiple IP addresses to a single network interface. It is quite useful in a shared web hosting for instance, particularly if the domains have SSL certificates. You can setup each domain to resolve to different IP address, even if they are all sharing the same network interface.

You have to be root to perform this tasks.

1. Disable Network Manager


# service NetworkManager stop

# chkconfig NetworkManager off

2. Add IP alias from cli


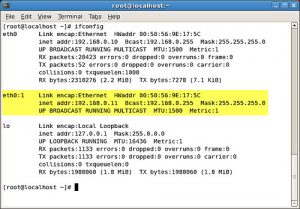
# ip addr addr add 192.168.0.11/24 dev eth0 label eth0:1

# ip addr show eth0

3. Persistently add lias

Create the file /etc/sysconfig/network-scripts/ifcfg-eth0:1

# cat /etc/sysconfig/network-scripts/ifcfg-eth0:1
DEVICE=eth0:1
IPADDR=192.168.0.11
PREFIX=24
ONPARENT=yes

4. Restart network service

# service network restart
# ip addr show eth0